Machine Learning and Image Processing on the CGC: Tools For Success
Machine learning is becoming ubiquitous in the bioinformatics space: applying machine learning algorithms to analysis of proteomics, genomics, and other -omics datasets has provided a wealth of analysis and interpretations of data not easily achievable by conventional methods. The CGC offers many helpful features for users performing machine learning (ML) and deep learning (DL) tasks that make it easy to work with artificial intelligence (AI). The CGC platform bridges the gap between exploratory computing environments and production applications in an easy and user-friendly way by offering seamless integration of the data, code-base, AI model, and computational environment for the purpose of creating reproducible pipelines harnessing the power of multiple GPUs. Importantly, it boasts a highly secure environment, utilizing the best practices for Security and Compliance, including many standards such as GDPR and HIPAA.
In addition, the CGC Knowledge Center provides thorough and detailed documentation, including many tutorials, guides, and other resources to help users quickly get started with their analysis on the platform. If users need any assistance, we have an expert scientific Support Team ready to help.
The Key Parts of an AI Project
The CGC contains features for all of the key aspects of an AI project, from data exploration, model generation to production.
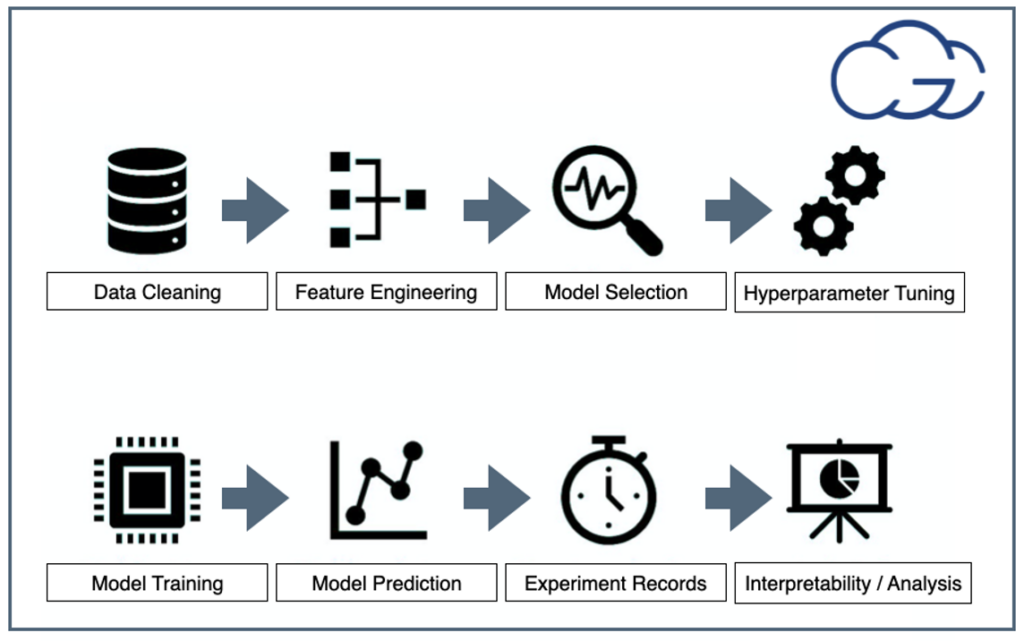 Figure 1: Steps For Any Machine Learning Project
Figure 1 above shows the key points of any AI project. Below, we briefly define each critical element:
- Data Cleaning: ETL (Extract, Transform, Load) and data readiness for AI is one of the most important and time-consuming steps in AI projects.
- Feature Engineering: is the process of using specific domain information to extract features from raw data, especially for traditional ML models.
- Model selection: can select from ready-to-use models, or training from scratch or via transfer learning options are also available.
- Hyperparameter tuning: is the problem of choosing the set of optimal configurations for learning algorithms, like learning rate and depth of the network.
- Model training: the most fundamental step is training a model with desirable frameworks.
- Model predictions: observe performance with unseen data with visualization.
- Experiment logging: tracking how the model behaves and learns, an essential part of ensuring reproducibility.
- Analysis and interoperability: the goal is to complete the analysis with clean and understandable results in a shareable format, which is vital for interoperability.
All of these key steps are smoothly integrated into the CGC, which provides numerous helpful features for users wishing to utilize ML/DL for their research.
The Machine Learning Lifecycle on the CGC in 6 main steps
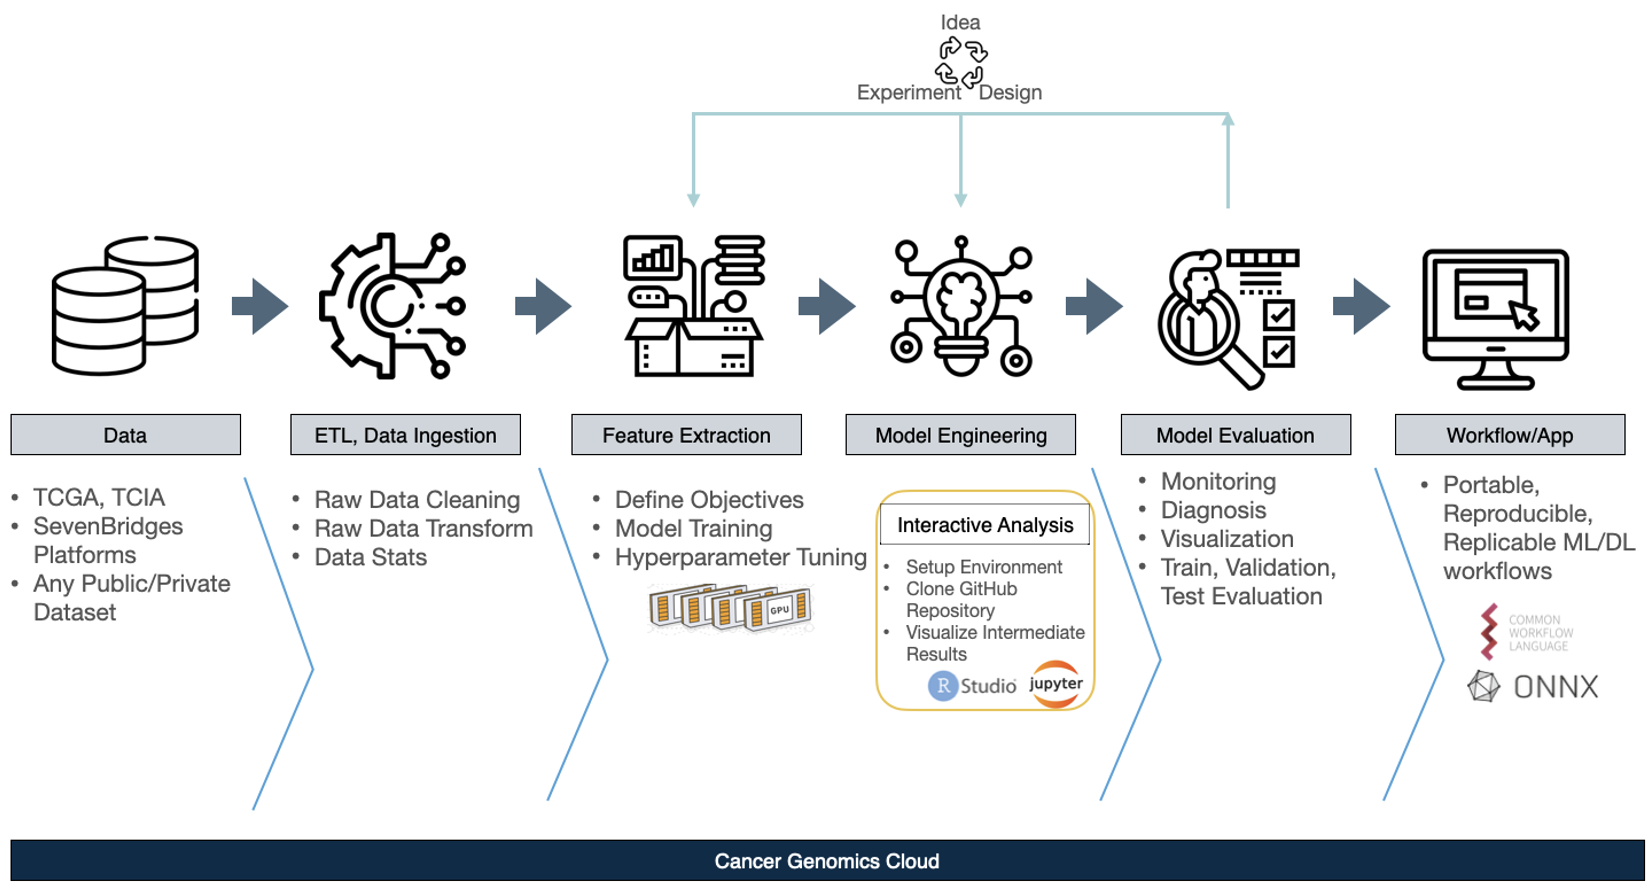
Figure 2: The Machine Learning Lifecycle on the CGC
Next, we delve into the features of the CGC platform that enable the ML lifecycle. The vast majority of ML lifecycles on the CGC platform will have the same six basic steps:
- Step 1: Data Integration
- Users can bring any public or private data they have to the platform or can access popular datasets directly, like TCGA.
- Step 2: ETL, Data Ingestion
- Data must be cleaned, and the necessary second step is to perform data cleaning for proper data-readiness, since the data is input for the ML/DL process. The CGC has excellent features to assist here specifically. For example, the user can do all ETLs directly in their individual projects on the CGC.
- Step 3: Feature Extraction, and Step 4: Model Engineering
- The CGC offers a variety of features to make these two core steps easier. For Feature Extraction: the Data Cruncher, an interactive analysis tool integrated with the CGC platform CGC using Jupyter Lab, allows for environments that can be manually managed in order to obtain intermediate features. For Model Engineering: it is necessary to tune the hyperparameter configurations of a selected model in order to find the most accurate model. Using this toolkit in conjunction with the power of multiple GPUs on the CGC allows each configuration to be run in parallel with batch processing. When completed, it will return the best-ranked model and its configuration to users according to the preselected performance metrics. All of these are tunable to be specific to their project, data and learning model.
- Step 5: Model Evaluation
- This is an especially important step of the AI application development lifecycle, since Model Evaluation will tell users how successful the previous data readiness and model engineering processes were. For this step, the CGC offers monitoring features and visualization capabilities, enabling easy diagnosis if any issues arise.
- Step 6: Workflow/App
- After considerable ideation, experimentation, and design cycles, the final step will be to make this model into a tool, notebook, or reproducible workflow. From there, users can share their model in CWL with collaborators. The most powerful features of the CGC platform are those that help to make the user’s projects portable, reproducible, and replicable.
Fast Prototyping on the CGC
Using the Data Cruncher’s interactive analysis tool on the CGC allows for data exploration, modeling, training, and visualization using familiar frameworks like Jupyterlab and RStudio. The Data Cruncher helps with fast prototyping tools as well: users can start to work on their data with their desired model in a minute, and evolve from prototyping to production-ready tools.
The Data Cruncher allows users to perform their ML analysis on data directly where it lives, which allows them to save the outputs of models and predictions to your CGC project. The Data Cruncher is fully integrated with the CGC, with easy access to any data on the platform: no need to download or move the data to analyze it interactively. Additionally, users can share outputs across their projects on the CGC or download them for local use.
How is your Machine Learning Tool Executed on the CGC?
The figure below illustrates the typical process of executing an ML tool or workflow on the CGC.
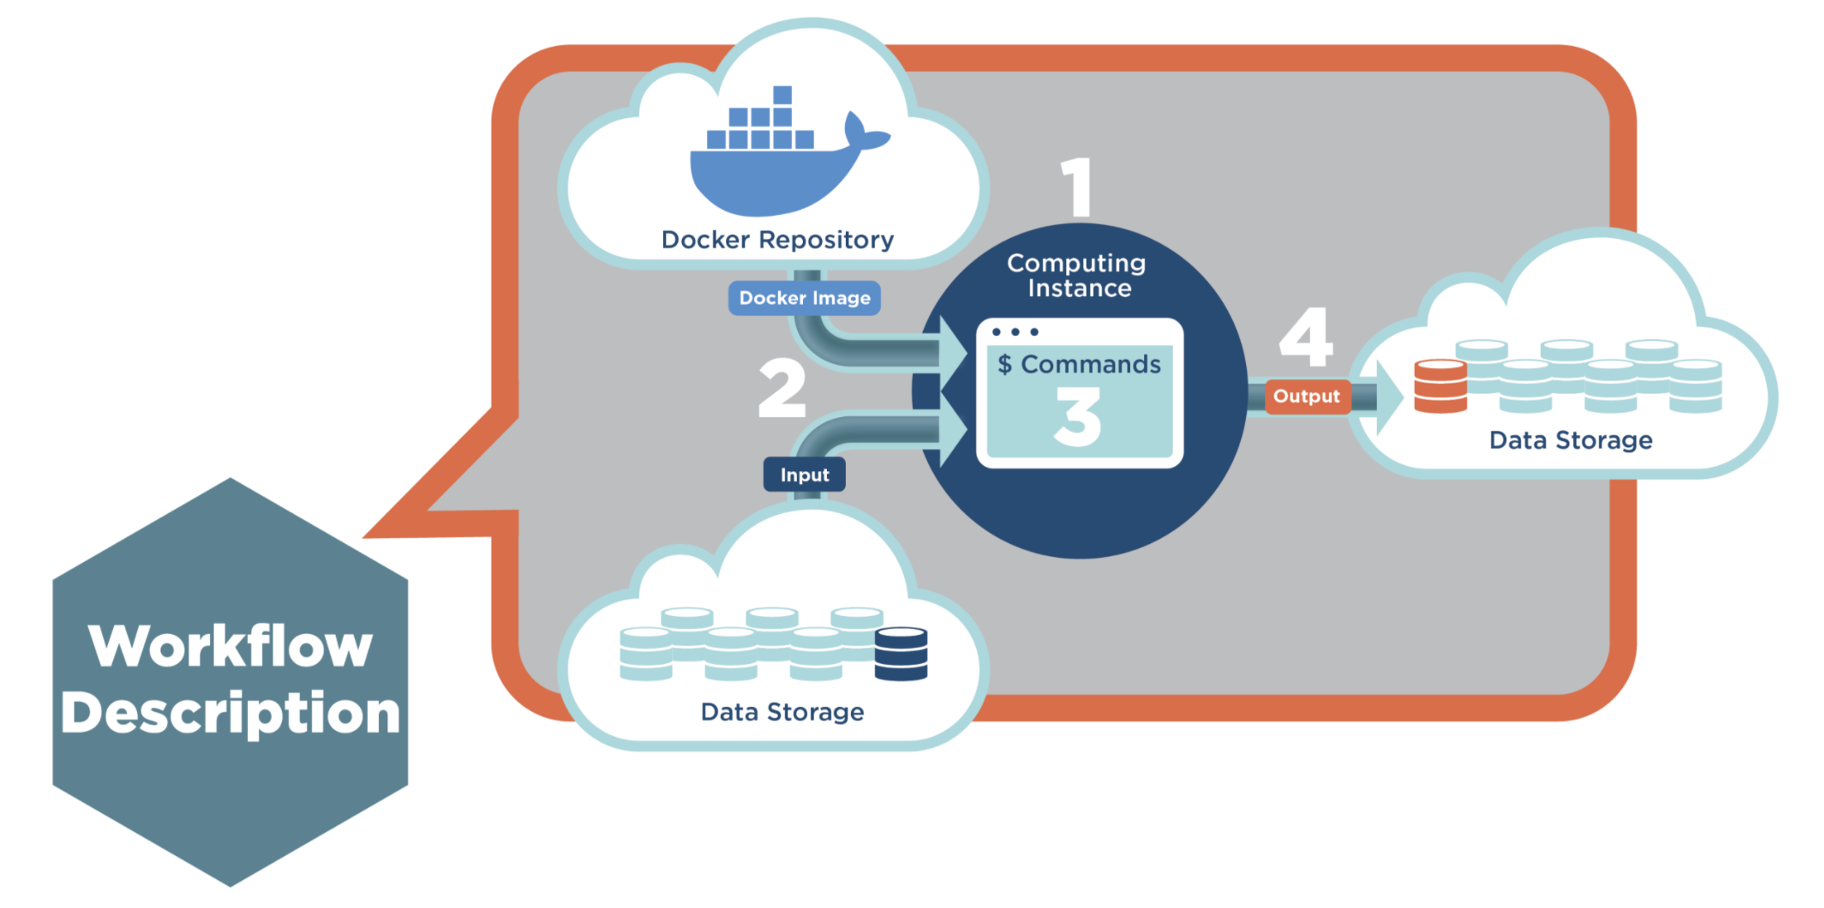
Figure 3: Machine Learning Tool execution in Four Steps
The process has four main steps. Step 1: The Scheduler assigns an empty instance to this job, according to the resource description in CWL. Step 2: The Executor mounts the input files to the instance and pulls the image from the SB Docker repository, then creates a container. Step 3: The Executor generates commands and runs the job inside the container. Step 4: Finally, after the job is done, the output will be sent back to project storage.
Monitor and Debug ML Tools on the CGC Easily
CGC offers a host of easy-to-use monitoring and debugging features. Users can view Instance Metrics including instance type and status, as well as Instance configuration – i.e., available vCPUs, Memory Disk space. Instance metrics are saved for two weeks after task completion. Additionally, Real-Time Job Monitoring offers live logs, standard output/error streams, workspace directories, and file previews, all of which are available during the duration of the task while the instance is active.
Spotlight: The SB Image Processing Toolkit
To highlight the ML capabilities on the CGC, we will focus on a powerful toolkit which the bioinformaticians at Seven Bridges have developed: The Seven Bridges (SB) Image Processing Toolkit. The SB Image Processing Toolkit was designed to utilize platform computing available on the CGC, to be flexible enough to handle various types of image data, and also to allow for image processing and genomic data integration. This toolkit is a collection of various deep-learning, preprocessing, and utility tools and workflows created with the purpose of performing image class prediction on any type of image data. Because the SB Image Processing Toolkit relies on the transfer learning approach in machine learning, it is not constricted to one dataset or data type. Most importantly, it was also designed to enable users to create and use ML image classifiers on the CGC without any prior knowledge or proficiency in coding. These tools work together to create an accessible, modifiable, easy-to-use infrastructure to enable various stages of ML and Image Processing (IP) such as image preprocessing, model training, and image class prediction. Harnessing the power of cloud computing alongside this toolkit on the CGC brings massive speed and price improvements compared to manual writing and running model training scripts. The toolkit also supports a variety of medical image types like histology, X-Ray, MRI, or more common picture formats like JPG or PNG.
Toolkit Overview: Image Processing Tools
Within the SB Image Processing Toolkit, we have published eight new tools: six were developed by the SB bioinformaticians, and two, HistoQC and HoVer-Net Inference, are open-source tools. We also have two custom DL apps, several histology and X-Ray image preprocessing tools, as well as utility tools to make the others easier to use. Below is a list of the tools in the toolkit sorted by category:
- Quality control:
- HistoQC tool is an open-source quality control tool for digital pathology slides. It performs fast quality control to not only identify and delineate artifacts, but also discover cohort-level outliers (e.g., slides stained darker or lighter than others in the cohort).
- Preprocessing:
- SB Histology Whole Slide Image Preprocessing helps users prepare whole slide images by removing background, pen marks, or other artifacts, resulting in cropped sections of the images.
- SB Stain Normalization involves casting an array of images in the stain colors of a target image. Stain normalization is used as a histopathology image preprocessing step to reduce the color and intensity variations present in stained images obtained from different laboratories.
- SB X-Ray Image Preprocessing Workflow allows users to perform one of several different algorithms for their images. It can perform preprocessing of X-Ray images such as amplifying high-frequencies, emphasizing the edges or improving the contrast in images.
- Deep Learning:
- SB Deep Learning Image Classification Exploratory Workflow is an image classifier pipeline and the main app in the DL toolkit, and is discussed in detail below. It relies on the transfer learning approach, which allows the use of pre-trained models as the starting point for building a model adjusted to given image datasets. Furthermore, the pipeline allows to train the model for a variety of hyperparameter combinations, while detailed metrics and visualizations help to determine the best configuration that can later be used to make predictions on new data instances.
- SB Deep Learning Prediction is an image classifier tool that classifies unlabeled images based on segmented data. It relies on the transfer learning approach to compose and train the model, and is discussed further below.
- HoVer-Net Inference is a tool that provides segmentation and classification of nuclei in multi-tissue histology images.
- Utility:
- SB Medical Image Convert performs medical image format conversion. If the input data are medical images in a non-standard format (e.g. SVS, TIFF, DCM, or DICOM), SB Medical Image Convert converts them to PNG format.
- SB Split Folders organizes an image directory into the train and test subdirectory structure. These train and test subdirectories are necessary inputs for the SB Deep Learning Image Classification Exploratory Workflow.
Image Processing Flow on the CGC
A high-level overview of how the tools in the SB Image Processing Toolkit connect to each other is shown in Figure 4 below:
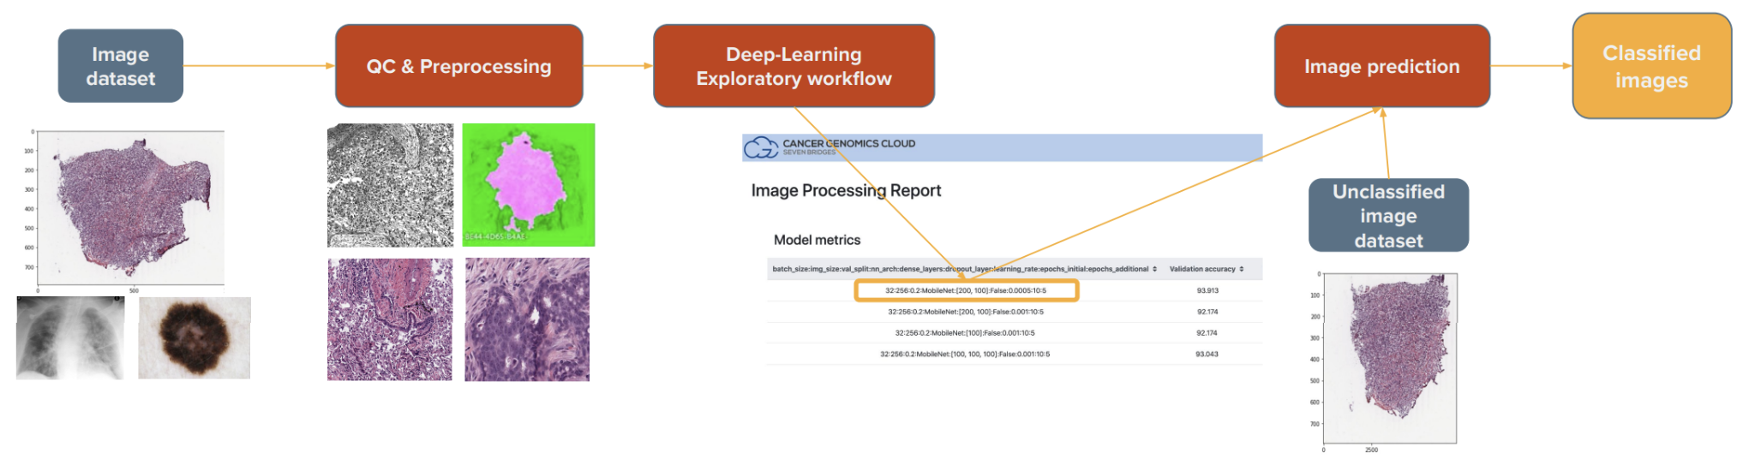
Figure 4: Image Processing Flow on the CGC
The starting point is the user’s image datasets, on which users can perform a series of quality control (QC) and preprocessing steps before model training. Next, the main DL Exploratory Workflow is used to build and train multiple models on the given dataset, generating comprehensive reports on each one to help users determine the best model for their dataset. Lastly, users will utilize that model configuration for the prediction of unlabeled image datasets.
The main focus of this toolkit is the DL apps. These are the crux of the toolkit, as they allow the building and training of image classifiers. As an added bonus, previous experience in machine learning or coding is not required to use these tools. DL is a subfield of ML, and it typically requires less human intervention but needs more computing power and training data than ML. This is what makes using it on the cloud ideal.
These apps are using Keras, which is an open-source deep learning API written in Python, running on top of the machine learning platform TensorFlow. They rely on the transfer learning approach, meaning we utilize pre-trained models from Keras (e.g. VGG, Xception, MobileNet). These models are already trained on a large and general enough dataset (like ImageNet), and as such, are used as a good starting point to build a machine learning model that is adjusted to the user’s specific dataset. This approach allows these tools to be used by a large number of researchers for a wide variety of use cases.
The SB Deep Learning Image Classification Exploratory Workflow
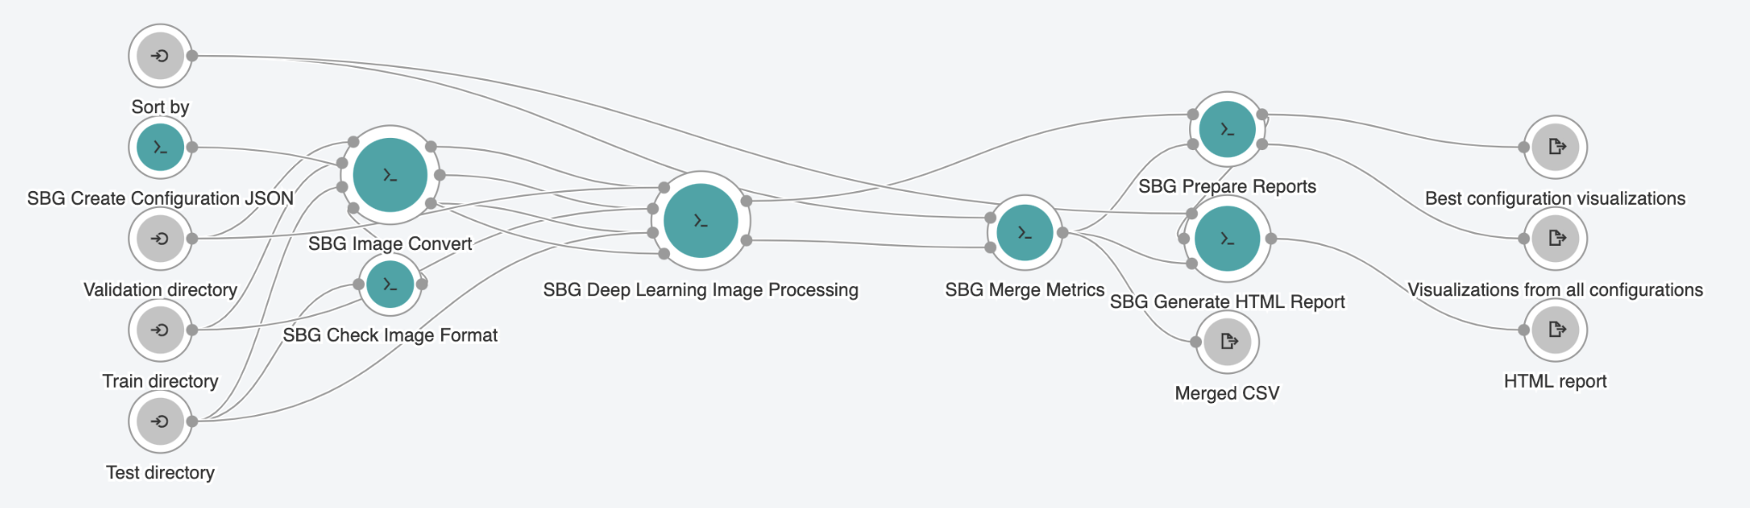
Figure 5: The SB Deep Learning Image Classification Exploratory Workflow
The main app in the toolkit, the SB Deep Learning Image Classification Exploratory Workflow, takes advantage of all of the benefits of cloud computing that the CGC has to offer. There are four major steps in this pipeline. Step 1 is to create multiple configurations. This is done via the first tool in the pipeline, the SB Create Configuration JSON tool, where users select various pre-trained models and/or hyperparameter values. This tool defines those series of model configurations and outputs them in JSON format. Step 2 provides support for multiple image formats via the SB Check Image Format tool and the SB Image Convert tool. Step 3 is the SB Deep Learning Image Processing tool itself. This tool, in combination with those multiple configurations, provides the main feature of this workflow: parallelization of the model training process across several different GPU instances. This is what underlies the speed and price improvement compared to traditional methods and ease of use in model training scenarios. Step 4 is the preparation of comprehensive reports and includes several tools that allow users to prepare the report to be able to see the results of the model training process.
As input, this pipeline takes a user’s labeled image dataset organized into training and test folders. For output, this pipeline provides users with reports and visualizations, including an interactive HTML report (see Figure 6 below), where users can take a close look at the result of each training model and select the one they want to use in the final prediction of unlabeled images.
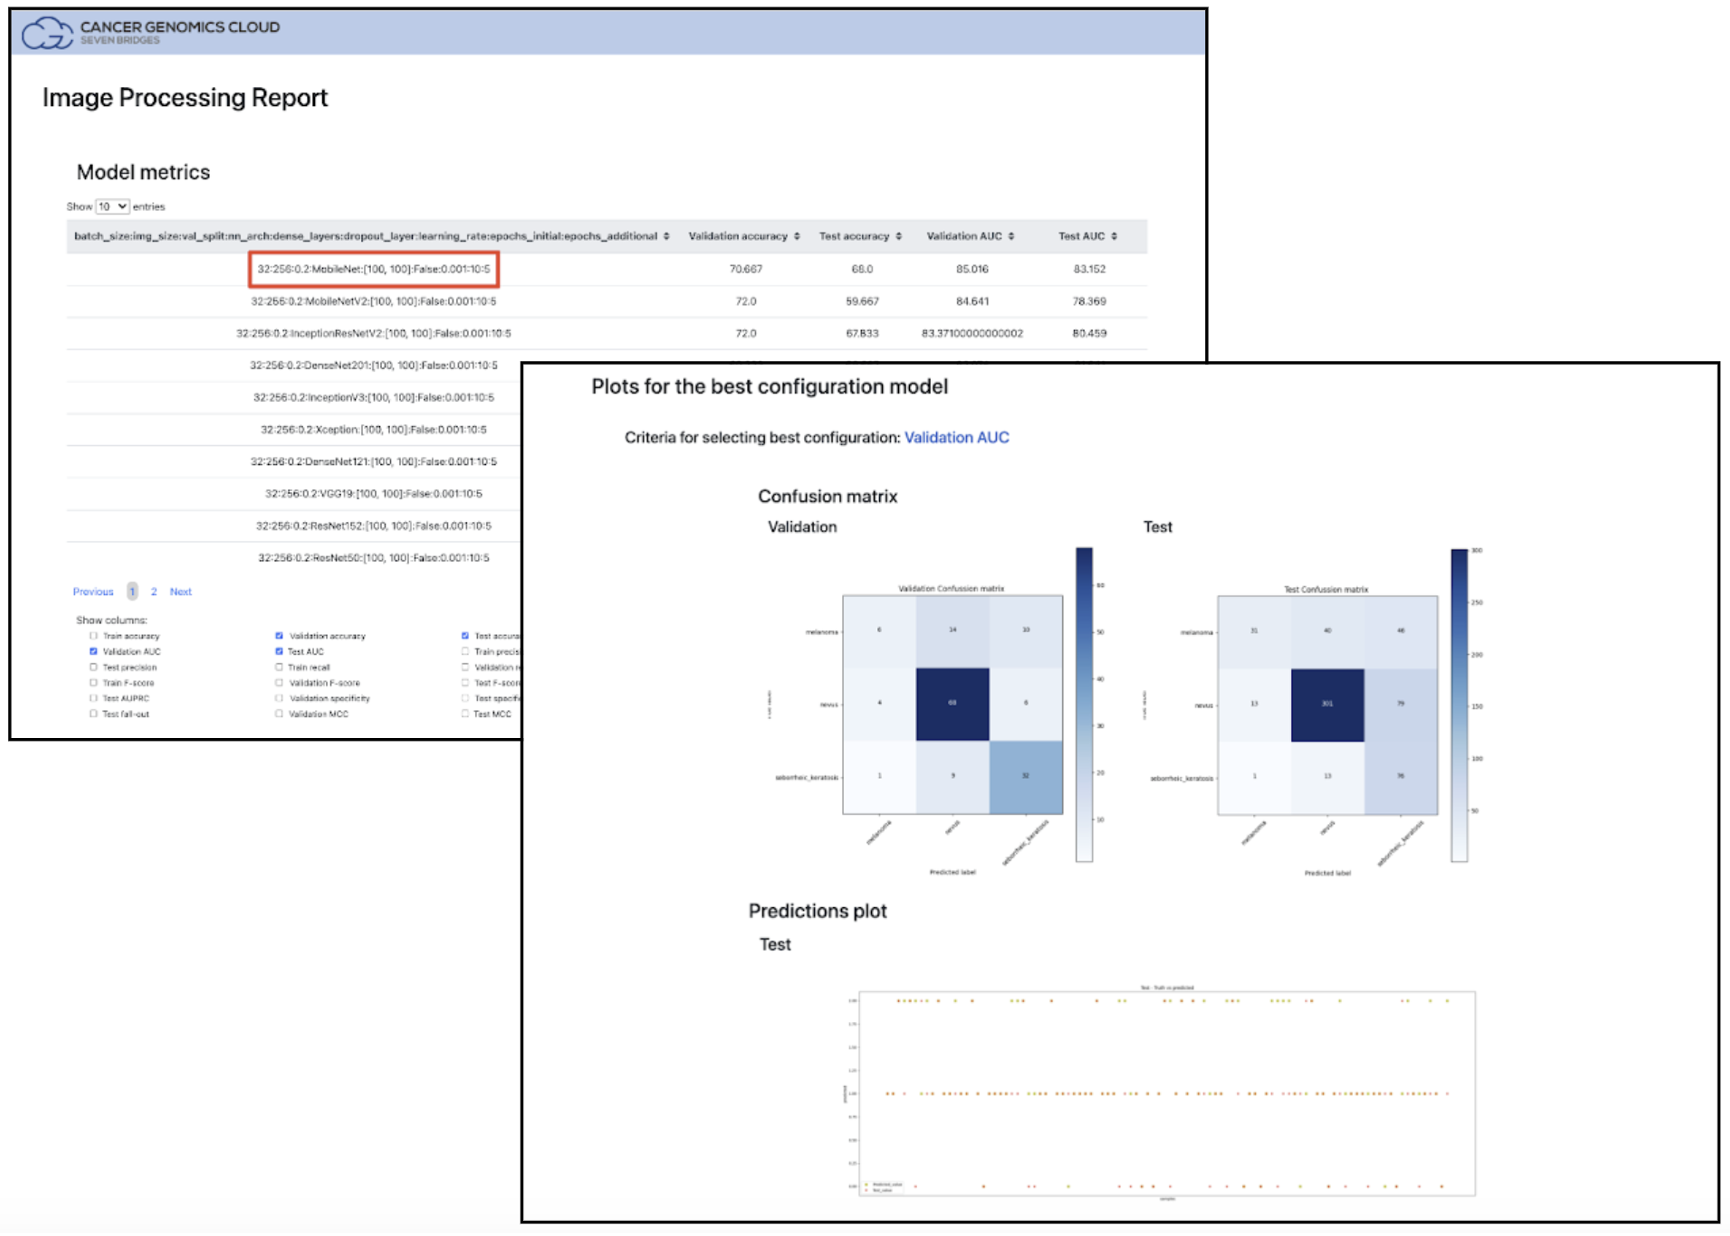
Figure 6: Image Processing Report output from the SB Deep Learning Image Processing tool. Highlighted in red, users can see the results for each model and select the best choice for the SB Deep Learning Prediction tool by using the Configuration string.
Performance Benchmarking – SB Deep Learning Image Classification Exploratory Workflow
Table 1 below displays the performance benchmarking data for the SB Deep Learning Image Classification Exploratory Workflow to show the time and cost-saving achieved. With the example dataset selected (620Mb in size) and training one configuration on one parallel instance: the total duration was approximately one hour, with a cost of approximately one US dollar. Ordinarily, running 24 different configurations would take 24 hours over multiple tasks, but using the power of parallel instances, this can be run in about 6 hours in just one task, costing approximately 30 US dollars. It is now possible for a researcher to come into work in the morning, train a large number of models at once, and see their results before the end of the workday!

Table 1: Performance Benchmarking for the SB Deep Learning Image Classification Exploratory Workflow
SB Deep Learning Prediction Tool
SB Deep Learning Prediction is the final app in the toolkit. This tool takes the best model previously found with the Exploratory Workflow in the form of a configuration string, and trains models on all of the labeled data (both train and test directories previously used). This allows the training to be performed on the largest labeled dataset available, providing the best training conditions for the best classification results. Finally, the prediction table is generated on output, containing image names, their predicted classes, and prediction probabilities.
In Conclusion
The CGC platform makes it easy to access numerous Image Processing apps on our Public Apps Gallery. For users with their own tools, the CGC platform features easy integration of custom ML tools as well. The tools in this featured toolkit enable fast and cheap analysis and image prediction and are all constantly updated and modified. We are eager to hear your feedback at support@sbgenomics.com!